← All Campaign Guides

Tacticus Fall of Cadia Campaign Guide

Beat every Fall of Cadia Normal and Elite stage with recommended Chaos teams, investment targets, and replay-backed strategies.

Replay data updated:

Overview

Timing

Advance first, collect missing medals later, and invest when the next farming node or campaign unlock justifies the cost.

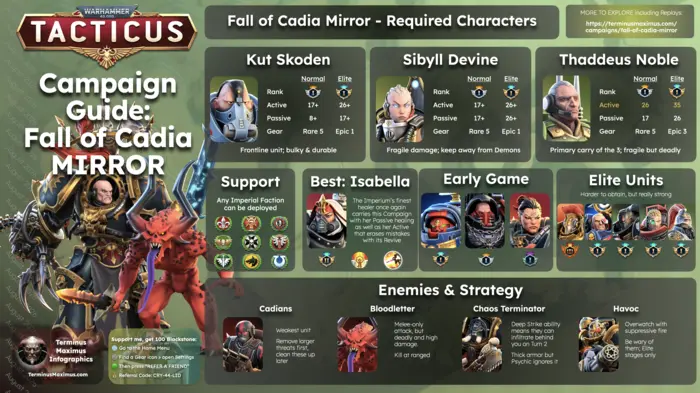
Fall of Cadia is a medium-high early priority once Angrax, Archimatos, and Haarken are unlocked. It opens Chaos upgrade nodes, the three characters required for Fall of Cadia Mirror, and one of the game’s best mission-farming stages.

Advance through Normal even when a battle awards only one or two medals. Boss nodes for Kut, Sibyll, Thaddeus, Celestine, and Creed are more valuable than forcing every third medal as soon as it becomes available.

Return for all 225 Normal medals when Elite farming becomes the next useful account goal. Test Elite immediately after it unlocks, then stop at an efficient material or shard breakpoint if full completion would demand excessive campaign-only investment.

Progression

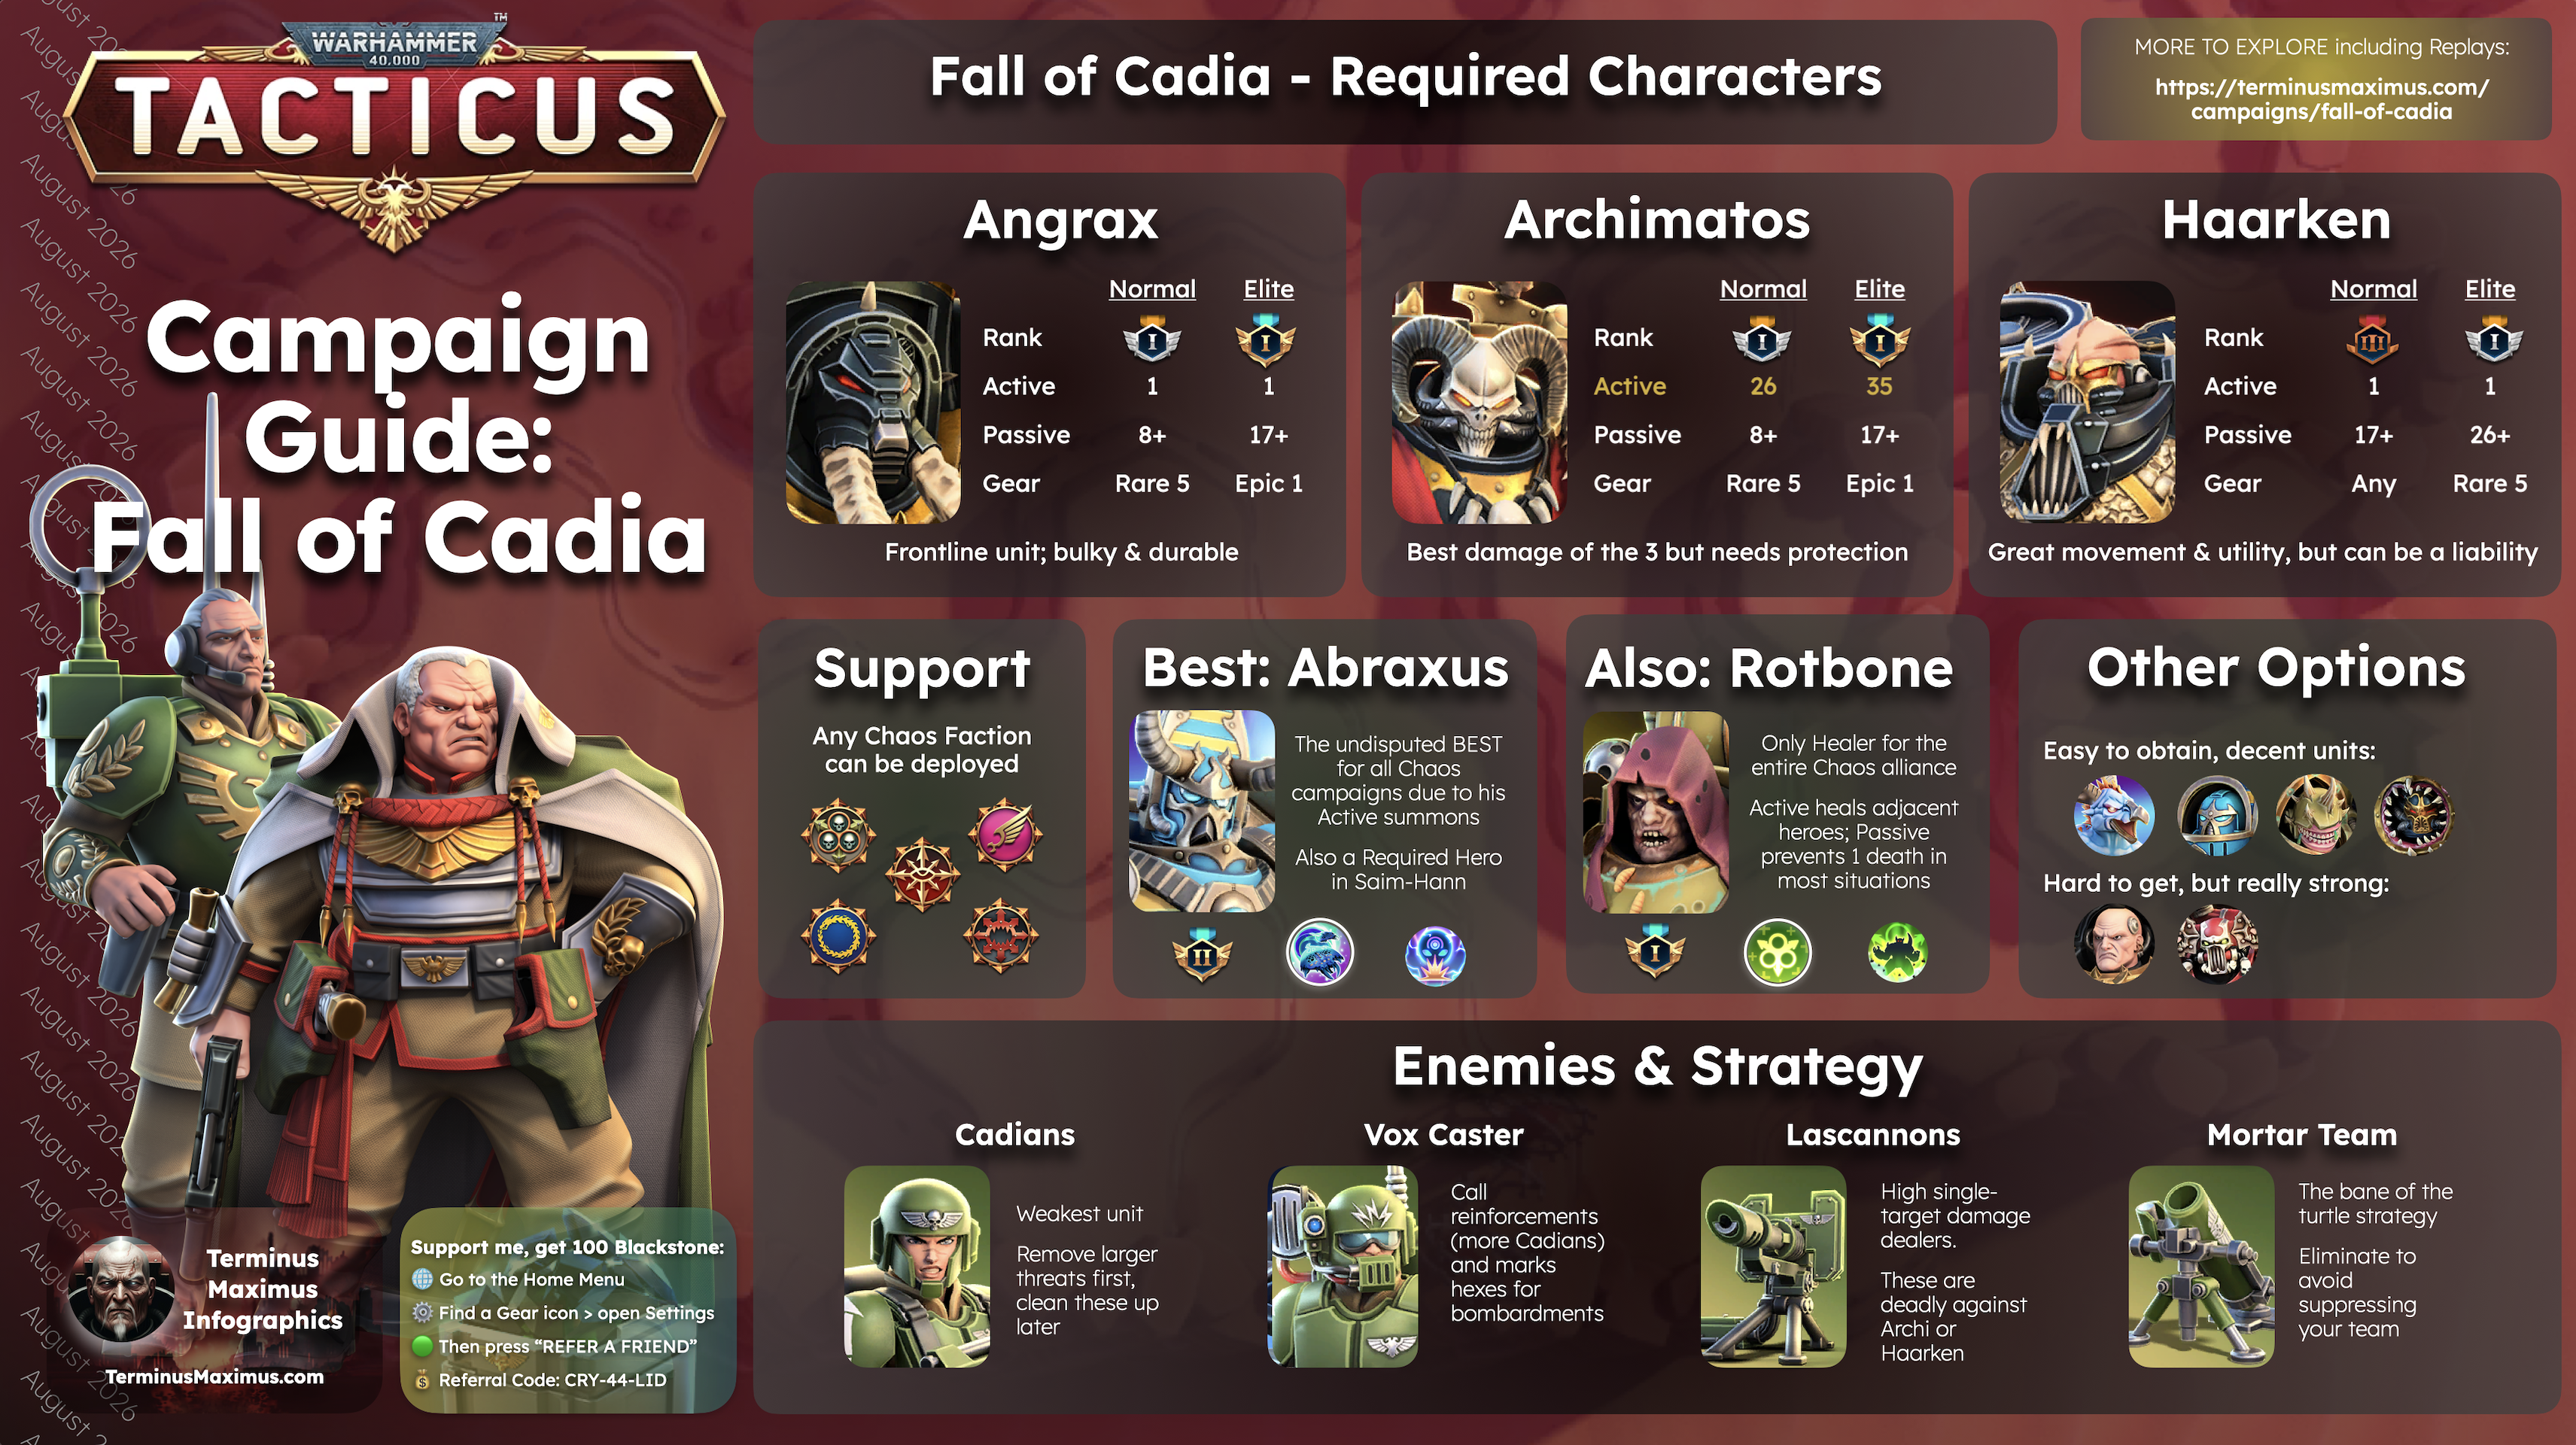
The efficient five-character team is Angrax, Archimatos, Haarken, Abraxas, and Rotbone.

Use Fall of Cadia as an account-building loop rather than a single uninterrupted project.

  1. Unlock Angrax, Archimatos, and Haarken through normal progression.
  2. Push Normal and open useful Chaos material and boss-shard nodes.
  3. Invest first in Angrax, then Archimatos, then Haarken.
  4. Add Abraxas for offensive summon pressure and Rotbone for medal protection.
  5. Return for all 225 medals when Elite becomes a useful objective.
  6. Attempt Elite immediately and farm the efficient nodes you can reach.
  7. Strengthen the required trio for restricted three-character stages.
  8. Pursue all 120 Elite medals only when the late nodes justify the investment.

Fall of Cadia 40 is unusually valuable for kill, damage, ability, and Angrax-passive missions because its Vox-Casters can continually call Guardsmen. Avoid killing or frightening away the Vox-Casters when using the stage for farming.

Restricted Elite stages prevent optional carries from replacing investment in the Black Legion trio. Abraxas and Rotbone are the best general open-stage pair, but Angrax, Archimatos, and Haarken still need enough durability to survive on their own.

Recommended Investment

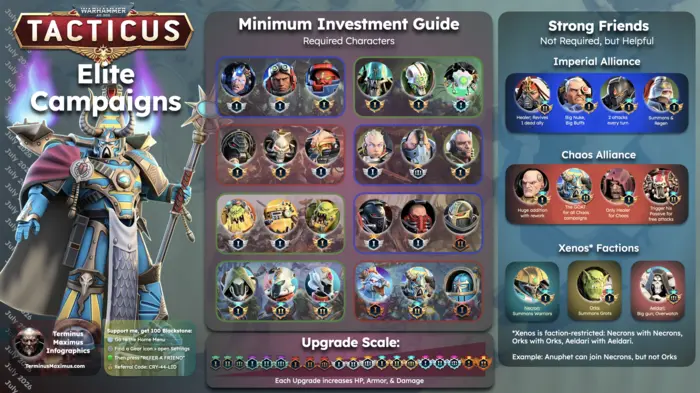
Normal Investment

HeroRankActivePassiveWeaponDefense
Drakfus Angrax Silver I rank Angrax active ability1 Angrax passive ability8+ 1 5
Master Archimatos Silver I rank Archi active ability26 Archi passive ability8+ 1 5
Haarken Worldclaimer Bronze III rank Haarken active ability1 Haarken passive ability17+ 1 3

Elite Investment

HeroRankActivePassiveWeaponDefense
Drakfus Angrax Gold I rank Angrax active ability1 Angrax passive ability17+ 1 1

Master Archimatos Gold I rank Archi active ability35 Archi passive ability17+ 1 1

Haarken Worldclaimer Silver I rank Haarken active ability1 Haarken passive ability26+ 1 5

Strategy & Tips

Deploy for Survival

Inspect ranges and elevation before starting. Keep Archimatos outside clean mortar and lascannon attacks, put Angrax on the dangerous approach, and save Haarken’s mobility for a priority backliner.

Force Heavy Weapons to Move

Stationary lascannons are most dangerous. Engage them, block their preferred firing hex with a summon, or deny elevation before trading damage with ordinary Guardsmen.

Summon With a Purpose

Bloodletters and Screamers should engage a priority target, absorb attacks, block routes, or occupy high ground. Their deaths do not reduce the campaign medal rating.

Protect the Weak Link

The AI often prefers an available kill. A tank or summon must block the route, occupy the firing hex, or offer an attractive alternative—not merely stand closer.

Keep Rotbone Adjacent

Rotbone’s resurrection requires adjacency when lethal damage is received. Place him beside the hero most likely to die while avoiding clustered area damage and Valkyrie markers.

Use Haarken After Contact

Let tanks and summons absorb the opening, then send Haarken to finish a weakened mortar, lascannon, Vox-Caster, or boss. Do not use him as the primary tank.

Diagnose Before Upgrading

A one-shot suggests rank or defensive gear; weak summons suggest ability levels; attrition suggests Rotbone or positioning; an unreachable mortar suggests mobility or target-order problems.

Required Heroes

Angrax, Archimatos, and Haarken are required throughout Fall of Cadia. Every recommendation below is loaded from the campaign recommendation JSON, so rank, ability, and equipment targets stay synchronized as those files change.

Master Archimatos portrait

Archimatos

Role: Ranged psyker, summoner, and board-control specialist.

Best tactical force multiplier: level the active and leave room for useful Bloodletter placements.

Rank
Normal Silver I rank Elite Gold I rank
Active
Normal26 Elite35
Passive
Normal8+ Elite17+
Weapon
Normal 1 Elite 1
Defense
Normal 5 Elite 1

Archimatos’s Bloodletters create damage, absorb attacks, restrict movement, occupy elevation, and engage heavy weapons. His Psychic damage also extends Abraxas summon chains.

Place summons where they change targeting or movement. Low-level Bloodletters can disappear before contributing, so the active is the main campaign badge priority even though Archimatos’s own defensive gear remains essential.

Silver I is a practical Normal target and Gold I is the initial Elite target. Protect him from concentrated mortar and lascannon fire; he remains an attractive AI target despite his rework.

Haarken Worldclaimer portrait

Haarken Worldclaimer

Role: Mobile melee finisher and kill-based damage snowball.

Keep him safe through the opening exchange, then use his mobility to finish the real threat.

Rank
Normal Bronze III rank Elite Silver I rank
Active
Normal1 Elite1
Passive
Normal17+ Elite26+
Weapon
Normal 1 Elite 1
Defense
Normal 3 Elite 5

Haarken’s mobility lets him reach lascannons, mortars, Vox-Casters, and weakened backliners that the other required heroes cannot. Feed him safe finishing attacks so Head-Claimer can build momentum.

Do not overextend him on turn one. He remains less durable than Angrax and performs poorly when sent alone into full-health Elite enemies.

He is third in required-character investment priority. Build enough rank and defensive equipment to survive restricted stages, then raise him further only when those stages or a broader roster role demand it.

Supporting Heroes

Abraxas and Rotbone are the strongest general-purpose pair for unrestricted stages: one creates offensive summon pressure, while the other protects medals through healing and resurrection.

Other Options
Yazaghor Ficklefate portrait

Yazaghor

Role: Abraxas-combo enabler and psyker repositioner.

A high-ceiling Abraxas partner, not a campaign requirement.

Yazaghor can switch positions with a friendly psyker and add Psychic damage, expanding Abraxas summon sequences on maps with safe spacing.

Bronze to Silver investment can enable the combo. Abraxas already works alone, so do not force Yazaghor onto a map where repositioning exposes the required trio.

Sokar Toth portrait

Toth

Role: Self-sustaining Terminator tank and ranged controller.

A durable cross-campaign investment when another tank is needed.

Toth can absorb the first lascannon attack and add a durable body without relying on summons. Silver I is useful for Normal and Gold I is a sensible Elite target.

He is required for Saim-Hann Mirror, so campaign investment can serve two progression paths.

Maladus Phlegmore portrait

Maladus

Role: Durable attrition tank with multi-target damage.

The accessible attrition choice, especially beside Rotbone.

Maladus is slow but extremely durable, applies Battle Fatigue pressure, and pairs exceptionally well with Rotbone. Silver I is enough for Normal support; Gold I is appropriate for Elite.

Choose him when raw durability and a stable front line matter more than mobility.

Volk, Reforged by the Warp portrait

Volk

Role: Ranged damage, Suppression, and clustered-enemy clearing.

A legitimate post-rework ranged option when you already value his wider roster role.

Volk’s 2025 rework substantially improved his health and armor and added Heavy Weapon, making older glass-cannon advice obsolete.

Use him around Silver I–II in Normal or Gold I in Elite when ranged control is needed, but he remains more situational than Abraxas or Rotbone.

Abaddon the Despoiler portrait

Abaddon

Role: Terminator tank and Chaos buffer.

Useful after his rework, though still a broader-roster choice rather than a campaign necessity.

Abaddon’s rework made him a credible frontliner whose buffs can improve Chaos allies and summon-heavy turns. Silver I–II can help Normal; Gold I is the Elite target when already owned.

Do not unlock or build him solely for Fall of Cadia, but older advice dismissing him is now outdated.

Kh√¢rn the Betrayer portrait

Khârn

Role: Premium melee damage carry and priority-target remover.

Exceptional damage for an established roster; unnecessary as a campaign-specific build.

Khârn can delete lascannons, bosses, and clustered threats, but his mechanics demand careful ally positioning and his investment cost is excessive for a beginner campaign project.

Use an existing Gold-or-higher build when Khârn is already a competitive-roster priority.

Difficult Stages

The stages below generated the strongest concentration of community help requests, difficult replay searches, and “final missing medal” complaints. Difficulty is not determined by rank alone—deployment, equipment, target priority, and enemy behavior can be just as important.

Normal
26

Normal 26 — Required-Trio Check

Why players struggle

Limited supporting slots expose weak required heroes and unstable Battle Fatigue outcomes.

Strategy

  • Protect Archimatos from the opening attack.
  • Let Angrax absorb the first high-value hit.
  • Use Haarken only after a safe finishing target appears.
  • Restart when flee behavior produces an unrecoverable opening.

Closing note

Bronze clears are challenge minima; consistent progress depends on summon levels, defensive gear, and careful deployment.

45

Normal 45 — Thaddeus Noble

Why players struggle

Mortar pressure reaches protected backliners while lascannons punish an exposed opening.

Strategy

  • Advance or deep strike Angrax toward the central threat.
  • Use Bloodletters to absorb fire and engage heavy weapons.
  • Send Haarken toward reachable artillery rather than directly at Thaddeus.
  • Do not leave a stationary lascannon on elevation.

Closing note

Remove the firing lanes before committing to the boss.

60

Normal 60 — Celestine

Why players struggle

Celestine’s durability and Geminae create misleading burst opportunities.

Strategy

  • Control the escorts before committing every active.
  • Preserve summons or burst for the decisive Celestine turn.
  • Avoid clustering where supporting fire can reach several heroes.
  • Keep the weakest required hero outside the easiest kill route.

Closing note

Treat Celestine as a sequence, not a single burst target.

61

Normal 61 — Mandatory Survival

Why players struggle

Premium supports cannot compensate when an underbuilt Haarken or Archimatos is exposed.

Strategy

  • Move the best defensive gear to the vulnerable hero.
  • Use Angrax to draw the first attack.
  • Accept a slower clear rather than exposing Haarken.
  • Use summons to block attacks instead of maximizing damage.

Closing note

This stage checks the mandatory roster, not the strength of optional supports.

69

Normal 69 — Mandatory Survival

Why players struggle

Another restricted deployment makes weak required heroes the AI’s easiest targets.

Strategy

  • Deploy for safe attack routes rather than opening damage.
  • Force heavy weapons to move before exposing Archimatos.
  • Preserve Haarken for cleanup.
  • Hide damaged heroes during the final turns.

Closing note

Survival and target control matter more than finishing quickly.

75

Normal 75 — Creed

Why players struggle

Vox reinforcements, heavy weapons, and the boss create competing priorities while every hero must survive.

Strategy

  • Establish a safe side of the map.
  • Remove lascannons and Vox-Casters that threaten the backline.
  • Use summons to isolate firing lanes.
  • Collapse on Creed only after the crossfire is controlled.

Closing note

Do not chase Creed through an active firing lane.

Elite
26

Elite 26 — Required Trio Only

Why players struggle

The restriction removes both Rotbone’s healing and Abraxas’s summon carry.

Strategy

  • Enter with Gold I Archimatos and Angrax and Haarken near Gold I.
  • Use Bloodletters to create the missing fourth and fifth bodies.
  • Protect Haarken until a safe finisher opens.
  • Restart an opening that exposes Archimatos to lethal fire.

Closing note

Optional heroes cannot solve this stage; invest in the required trio and Archimatos’s active.

33

Elite 33 — Final-Chapter Stat Check

Why players struggle

A final-chapter stat spike combines with another three-character restriction.

Strategy

  • Treat Gold I as a challenge baseline, not a guarantee.
  • Move the best defensive equipment onto the likely target.
  • Use Angrax to deny elevation and firing lanes.
  • Restart if the opening mortar or lascannon attack creates an unrecoverable death.

Closing note

Gold II Archimatos and Angrax substantially reduce the stage’s variance.

35

Elite 35 — Competing Firing Lanes

Why players struggle

Dense late-Elite threats often make this one of the final missing-medal stages.

Strategy

  • Use Abraxas and Rotbone as the safest general pairing.
  • Place Abraxas where several summon hexes remain free.
  • Keep Rotbone adjacent to the hero at one-shot risk.
  • Without Abraxas, use Maladus or Toth to block approaches while Bloodletters absorb attacks.

Closing note

Control both damage and survival; an extra weak support only gives the AI an easier kill.

40

Elite 40 — Creed

Why players struggle

The final boss combines mortars, lascannons, reinforcements, and intense survival pressure.

Strategy

  • Lure or engage the lascannon before committing to Creed.
  • Use Haarken to reach mortars after the opening exchange.
  • Isolate Creed with summons and a durable frontliner.
  • Preserve Rotbone adjacency and keep Archimatos from becoming the easiest target.

Closing note

Remove the crossfire, isolate Creed, and finish with the mandatory trio protected.

Bosses

The five Fall of Cadia bosses appear at Normal Stages 15, 30, 45, 60, and 75. Their Elite chapter encounters occur at Stages 8, 16, 24, 32, and 40.

Kut Skoden portrait

Kut Skoden

Normal 15Elite 8

Use summons to block Kut’s approach while the required trio removes his support.

Do not let a vulnerable hero become the easiest melee target.

Collapse on Kut only after the dangerous firing lane is controlled.

Sibyll Devine portrait

Sibyll Devine

Normal 30Elite 16

Spread enough to limit clustered Psychic damage while keeping Rotbone adjacency when needed.

Use summons to occupy approach hexes and redirect attacks.

Remove heavy weapons before committing the required trio to Sibyll.

Thaddeus Noble portrait

Thaddeus Noble

Normal 45Elite 24

Thaddeus and mortar pressure can reach protected backliners, so deployment matters immediately.

Engage lascannons with Angrax or summons and send Haarken toward reachable artillery.

Attack the boss after the long-range threats can no longer remove Archimatos.

Celestine, the living Saint portrait

Celestine

Normal 60Elite 32

Account for the Geminae and Celestine’s survival mechanics before spending every active.

Preserve summon pressure or burst damage for the decisive boss turn.

Avoid creating an exposed cluster while controlling her escorts.

Lord Castellan Ursarkar E. Creed portrait

Castellan Creed

Normal 75Elite 40

Control lascannons, mortars, and Vox reinforcements before chasing Creed.

Use summons and a durable frontliner to isolate the boss from the firing line.

Keep Rotbone beside the likely casualty and protect Archimatos through the final cleanup.

Campaign Replay Filters

Stuck on a specific stage? Select the difficulty and stage number to compare team compositions, hero ranks, and successful strategies.

Every recommendation on this page is supported by campaign research, documented clears, or the Terminus Maximus Campaign Replay Library. Use the filters below to find successful Fall of Cadia runs for any available Normal or Elite stage.

Compare teams carefully. A low-rank clear may depend on stronger equipment, a premium supporting hero, a heavily developed carry, favorable enemy movement, or exact turn-by-turn positioning. The most useful replay is not always the one with the lowest ranks—it is the one whose roster and investment most closely resemble your own.

More Filters

Campaign Replays

Normal 15 1 replay Maladus Phlegmore
Normal 29 1 replay Nauseous RotboneMaladus Phlegmore
Normal 30 2 replays Nauseous RotboneMaladus Phlegmore
Normal 45 1 replay Maladus PhlegmoreNauseous Rotbone
Normal 60 3 replays Maladus PhlegmoreVolk, Reforged by the WarpCorrodius AchebileNauseous Rotbone
Normal 61 1 replay
Normal 62 1 replay Maladus Phlegmore
Normal 63 1 replay Maladus PhlegmoreTyphus, Host of the Destroyer Hive
Normal 64 1 replay Maladus PhlegmoreTyphus, Host of the Destroyer Hive
Normal 65 2 replays Typhus, Host of the Destroyer HiveMaladus PhlegmoreNauseous Rotbone
Normal 66 1 replay Typhus, Host of the Destroyer HiveMaladus Phlegmore
Normal 67 1 replay Volk, Reforged by the WarpAbaddon the Despoiler
Normal 68 1 replay Volk, Reforged by the WarpTyphus, Host of the Destroyer Hive
Normal 69 1 replay
Normal 70 3 replays Volk, Reforged by the WarpAbaddon the DespoilerNauseous RotboneMaladus Phlegmore
Normal 71 1 replay
Normal 72 3 replays Abaddon the DespoilerVolk, Reforged by the WarpMaladus PhlegmoreNauseous Rotbone
Normal 73 1 replay Nauseous RotboneAbaddon the Despoiler
Normal 74 2 replays Abaddon the DespoilerNauseous RotboneCorrodius Achebile
Normal 75 2 replays Volk, Reforged by the WarpNauseous RotboneAbaddon the Despoiler
Elite 1 1 replay Nauseous RotboneAbaddon the Despoiler
Elite 2 1 replay Nauseous Rotbone
Elite 3 1 replay Nauseous RotboneAbaddon the Despoiler
Elite 4 1 replay Nauseous RotboneAbaddon the Despoiler
Elite 5 1 replay Nauseous Rotbone
Elite 6 1 replay
Elite 7 1 replay Nauseous RotboneAbaddon the Despoiler
Elite 8 1 replay Nauseous RotboneMaladus Phlegmore
Elite 9 1 replay Nauseous RotboneAbaddon the Despoiler
Elite 10 1 replay Nauseous Rotbone
Elite 11 1 replay
Elite 13 1 replay Nauseous RotboneAzkor, the Eightfold
Elite 14 1 replay Nauseous Rotbone
Elite 15 1 replay Nauseous RotboneAzkor, the Eightfold
Elite 16 1 replay Maladus PhlegmoreNauseous Rotbone
Elite 17 1 replay Maladus PhlegmoreNauseous Rotbone
Elite 18 1 replay Nauseous RotboneMaladus Phlegmore
Elite 19 3 replays Nauseous Rotbone
Elite 20 2 replays Maladus PhlegmoreNauseous RotboneAzkor, the Eightfold
Elite 21 1 replay Maladus PhlegmoreNauseous Rotbone
Elite 23 2 replays Arkarzar AbraxasNauseous Rotbone
Elite 24 2 replays Maladus PhlegmoreNauseous RotboneArkarzar Abraxas
Elite 25 1 replay Volk, Reforged by the WarpNauseous Rotbone
Elite 26 1 replay
Elite 27 1 replay Nauseous Rotbone
Elite 28 1 replay Nauseous Rotbone
Elite 29 1 replay Nauseous Rotbone
Elite 30 1 replay Maladus PhlegmoreNauseous Rotbone
Elite 32 2 replays Corrodius AchebileNauseous RotboneMaladus Phlegmore
Elite 34 1 replay Nauseous Rotbone
Elite 35 2 replays Maladus PhlegmoreNauseous RotboneYazaghor FicklefateArkarzar Abraxas
Elite 36 1 replay Nauseous Rotbone
Elite 37 1 replay Nauseous RotboneMaladus Phlegmore
Elite 40 1 replay Arkarzar AbraxasNauseous Rotbone

Campaign Replay Statistics

These ranks change as you apply Filters

Drakfus Angrax portrait
Angrax Elite: 34 stages Normal: 20 stages
Max Rank
Gold II rank badge
Gold II
Master Archimatos portrait
Archi Elite: 34 stages Normal: 20 stages
Max Rank
Gold I rank badge
Gold I
Haarken Worldclaimer portrait
Haarken Elite: 34 stages Normal: 20 stages
Max Rank
Gold III rank badge
Gold III
Nauseous Rotbone portrait
Rotbone Elite: 31 stages Normal: 10 stages
Max Rank
Silver III rank badge
Silver III
Maladus Phlegmore portrait
Maladus Elite: 11 stages Normal: 12 stages
Max Rank
Gold I rank badge
Gold I
Abaddon the Despoiler portrait
Abaddon Elite: 5 stages Normal: 6 stages
Max Rank
Bronze III rank badge
Bronze III
Volk, Reforged by the Warp portrait
Volk Elite: 1 stage Normal: 6 stages
Max Rank
Silver I rank badge
Silver I
Typhus, Host of the Destroyer Hive portrait
Typhus Elite: 0 stages Normal: 5 stages
Max Rank
Iron III rank badge
Iron III
Arkarzar Abraxas portrait
Abrax Elite: 4 stages Normal: 0 stages
Max Rank
Gold I rank badge
Gold I
Azkor, the Eightfold portrait
Azkor Elite: 3 stages Normal: 0 stages
Max Rank
Silver I rank badge
Silver I
Corrodius Achebile portrait
Corro Elite: 1 stage Normal: 2 stages
Max Rank
Silver III rank badge
Silver III
Yazaghor Ficklefate portrait
Yaz Elite: 1 stage Normal: 0 stages
Max Rank
Iron I rank badge
Iron I